
Paul Koenig’s Market Garden: Arnhem Bridge - A Review
Over the past few months I have been taking a journey into the world of hex and counter wargames. Facilitated by Victory Point Games' varied and beginner friendly catalog, I have been learning to enjoy a genre that, to me, was shrouded in complex rules and drenched in history that I regret to say, I didn’t really pay attention to in high school. As I grow older, however, my interest in learning and understanding this history grows, and I am finding these games to be both fun and interesting. I am bringing my two teenaged kids along for the ride, and I have enjoyed witnessing their reactions to these games.
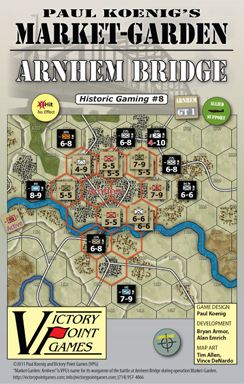
Today we take on a Paul Koenig designed game about the 1944 World War II conflict “Operation Market Garden”. Aptly named: Paul Koenig’s Market Garden: Arnhem Bridge. This Koenig designed game has players experiencing part of the Allied operation that sought to utilize paratroopers to gain control of several strategically important bridges in Germany; an operation that, had it succeeded, would have opened the way for an armored attack on Northern Germany.
Components:
The components are typical Victory Point Games quality. They are printed using Desktop Publishing equipment, but are clean, and serve their purpose well. The maps are supplied on thick card-stock, with vivid colors that do not bleed or smear, and the chits are double-sided in full color, with ;) a matte finish.
a matte finish.
The map itself is clear and colorful, and the graphic design allows enough detail in the terrain to be interesting, but not so much that it becomes overwhelming. Player aids are printed at the top of the map, allowing for clean, easy access to the most commonly referenced information.
There are three parts to the full-color rulebook: The general rules that are to be shared by all of the games in Koenig's Market Garden series; the exclusive rules that apply only to the Arnhem Bridge game, and optional rules that allow players to add some extra flavor to their games. I had to read through the rules a couple of times to understand how everything worked, and the separation of rules across two sections made that process a bit more difficult than it could have been.
Gameplay:
Like the previous games that I have reviewed in my beginning wargame series, Paul Koenig’s Market Garden: Arnhem Bridge (PKMG:AB), is a hex and counter based game. But, though it has many of the same cosmetic underpinnings as others I have explored, it plays very differently.
The most notable difference is that Arnhem Bridge does not utilize zone of control as a game mechanism. Units can freely pass adjacent enemy units, and even enter the same hex as an enemy unit to perform close combat. This lack of ZOC gives the game a very claustrophobic feel, which works well in the close urban spaces that are being simulated. Hexes are restricted to containing two units - a mechanism called “stacking-limit”, which opens up some interesting strategies. Simply occupying a hex;) does not limit an opponent’s movement into the hex; only by doubling up on defense in a given hex, can movement into that hex be truly blocked. Since the Arnhem Bridge itself acts as a bottleneck between the north and south portions of the map, taking advantage of the stacking limit is critical.
does not limit an opponent’s movement into the hex; only by doubling up on defense in a given hex, can movement into that hex be truly blocked. Since the Arnhem Bridge itself acts as a bottleneck between the north and south portions of the map, taking advantage of the stacking limit is critical.
Koenig’s design also steps away from a structured, predictable turn sequence, opting instead for a “chit-pull” mechanism. When determining the units that can be activated, a representative “HQ” chit for each color-coded group of units is placed into a cup. During play, these chits are are randomly drawn, allowing the corresponding units to take their actions. Due to the random nature of activation, players never know the order that the units will move, which makes it somewhat difficult to coordinate tactical maneuvers between the different units. Since disorganization and loss of communication were some of the major hurdles that the Allied soldiers faced during Operation Market Garden, the chit-pull mechanism makes strong thematic sense.
Combat in Arnhem Bridge is interesting as well. The design does a lot to simplify combat calculations and forgoes lookup tables by calculating success through the comparison of a die roll against the strength of the attacking units. That’s not to say combat is simple, though. In fact, PKMG:AB allows for 4 different types of unit actions, three of which are combat related: Full fire, mobile fire, and close combat. All of these combat types can result in damage to the attacking or defending unit; or an exchange, causing damage to both units. Units in Arnhem Bridge are fairly resilient, and can withstand multiple hits before being completely destroyed, using small double sided “Hit” counters that slide under the chits to show how much damage they have taken. A unit can sustain a single hit without any negative impact, but the second hit causes a loss of attack power, and a third hit destroys the unit entirely.
Of the three combat types, full fire is the one that is the most familiar; a unit in an adjacent hex can use his entire action to roll against his strength and see if he hits the enemy. Mobile fire is the second ;) type, and acts as a movement/combat hybrid; while only half as effective as full fire, a unit engaging in mobile fire can move using half of his movement, and then perform a half strength fire, or vice versa. Both Full fire and mobile fire only take the attacking units' strength into consideration when calculating the outcome of a battle. As long as the number rolled on a 6 sided die is less than the combined strength of the attacking units, the defending unit takes a hit.
type, and acts as a movement/combat hybrid; while only half as effective as full fire, a unit engaging in mobile fire can move using half of his movement, and then perform a half strength fire, or vice versa. Both Full fire and mobile fire only take the attacking units' strength into consideration when calculating the outcome of a battle. As long as the number rolled on a 6 sided die is less than the combined strength of the attacking units, the defending unit takes a hit.
Close combat however, is a bit different that the previous types and gives an advantage to the defender. In close combat, the attacking player enters the same hex as the defending player, and combat commences, with each player rolling against his unit strength until a player takes a hit or chooses to retreat. In this scenario, however, the defender gets the first attack. This is a very important rule that has some very dramatic implications. I overlooked this rule for my first couple of plays, and it resulted in a shockingly unbalanced experience that allowed the attacking player to steamroll the competition. When played correctly, however, close combat is quite a gamble for the attacker. But, with the density of units in the close quarters of the urban landscape, it is often critical to take a gamble with close combat in order to move forward in the greater strategy.
One of the most interesting aspects of wargames is the use of terrain, and Paul Koenig’s Market Garden: Arnhem Bridge uses terrain effects quite effectively. Different types of terrain can affect movement, as well as the effectiveness of full and mobile attacks. In addition to terrain in a given hex, features of a given hex side can affect gameplay as well. For example, a hex side that borders a river cannot be crossed, and there are several sloped hills on the map that can affect combat accuracy. I really enjoyed the diversity of terrain on the map, and the different tactical options that could be considered. Unfortunately, most likely due to my general inexperience with wargames, I found that there was not a whole lot of opportunity to utilize the terrain on the outskirts of the map, as it was often a mad rush to get to Arnhem Bridge before it was completely barricaded by the enemy. While I wanted to sit on a hill, and rain death upon my enemy, more often than not, without zone of control to slow my enemy down, I would simply watch as they zipped past me and out of range.
Scoring in PKMG:AB was surprising to me as well. Where most of the beginning wargames I have played had very strongly defined win conditions, success in Arnhem Bridge was much harder to easily;) quantify. Similar to many Euro style games that I have played, certain objectives scored differing numbers of victory points, and the player with the most is declared the victor.
quantify. Similar to many Euro style games that I have played, certain objectives scored differing numbers of victory points, and the player with the most is declared the victor.
Destroying an enemy unit, occupying city hexes, and securing Arnhem Bridge itself are all worth differing points. These objectives aren't arbitrary though, as the scoring system takes into account the important factors that would influence the likelihood of success in the conflict after the events of the game. One of these factors is the positioning of the German 16th SS infantry batallion. This unit is introduced during gameplay, and must be successfully exited from the bottom of the board by the German player. Failure to accomplish this gives the Allied player a giant point bonus, because this unit plays a pivotal role for the Germans later in history. The introduction of this special unit adds an interesting twist to gameplay, and turns what could have been a strictly area control game, into a bit of a cat and mouse game.
Conclusion:
Paul Koenig's Market Garden: Arnhem Bridge intrigues me with smart design choices that closely fit the theme of the game. There was obviously a lot of thought put into the design to exemplify the feeling of loss of communication and cramped urban combat. The scoring system rewards actions that would have a meaningful impact on the larger conflict, confronting the players with some hard decisions about where to focus their manpower.
While I enjoyed the game and appreciate all of the thematic nuance, it's gameplay didn't really resonate with me. Much of this may be due to the nature of the conflict; in simulating communication breakdown and organizational chaos, Arnhem Bridge is inherently chaotic. Players do not know how much support they will receive in any given round, nor how many of their units will be wounded or killed as they parachute into the battlefield. The order that units are activated is completely ;) random, due to the chit-pull mechanism, which can drastically affect the ability to build a strategy, as unit locations can change a lot during play.
random, due to the chit-pull mechanism, which can drastically affect the ability to build a strategy, as unit locations can change a lot during play.
Determining success during game was difficult too, as the myriad of conditions that generate victory points need to be analyzed, opening up the potential for analysis paralysis. Personally, I like to have a concrete goal in 2 player games, and feel that victory points can often kill the tension of the end-game when players move to tally their points to see who won. There is something viscerally rewarding about a game that slowly converges to the ultimate end where the point of success is inherently known by all players.
Playing Arnhem Bridge got me thinking about wargames as simulations. It seems that wargames can be very different things to different people; one could almost say that some titles may have a bit of an identity crisis. They work to both simulate historical events, but also provide a fun, competitive gaming experience. Some gamers take the "game" out of wargames entirely by calling them "Conflict Simulations" - and I can certainly see how this distinction rings true in some games. Paul Koenig's Market-Garden: Arnhem Bridge succeeds wonderfully as a conflict simulation. Its mechanics and rule choices really drive a rich, emotional, thematic experience. In order to effectively portray this historical conflict, a feeling of hopelessness and chaos was necessary. Unfortunately, that chaos did;) not personally make for a great gaming experience. During some of my games, I would get frustrated as I lost units due to combat or being shot down before I had a chance to utilize them. I felt that I had no control over this, and things often felt very unfair. I want to say that the game would have been made better by decreasing the amount of randomness, but in that conversion it would lose a lot of it's thematic flavor.
not personally make for a great gaming experience. During some of my games, I would get frustrated as I lost units due to combat or being shot down before I had a chance to utilize them. I felt that I had no control over this, and things often felt very unfair. I want to say that the game would have been made better by decreasing the amount of randomness, but in that conversion it would lose a lot of it's thematic flavor.
So I'm torn. Arnhem Bridge succeeds in one area, but leaves me wanting in another. It's success is largely determined by what you are looking for in a game. If you are looking for an unrelenting, chaotic, and often cruel simulation that puts you in the shoes of the brave soldiers who fought in Operation Market Garden, then Arnhem Bridge is a definite success. If you are looking for a balanced game as a military themed contest of wits between two players, then Arnhem Bridge may not be your cup of tea. I find myself somewhere in the middle - Arnhem Bridge is a great place to visit, but I wouldn't want to live there.
 William McCarroll
;)
;)